Documentation
Write a better README
A README is a plaintext file that includes a detailed description of a project. It’s typically located in the root directory, and often includes:
- A broad overview of what the project does, why it was made, and the rationale behind the way it was implemented
- Instructions for how to install or run the code
- Links to other related tools or resources
- Recognition of various contributors
- Status updates, feature roadmaps, and an overview of the project’s overall orientation
makeareadme.com is a great resource that provides advice for writing clear and helpful readmes, including a template that you may adapt for your own purposes.
Code comments
Code comments appear as silent (i.e. non-functional) text embedded in the source code. They communicate what functions do by providing a brief description of how they are situated in broader workflows. They may also include notes and task lists for iteratively improving existing functions.
Some qualities of good code comments include:
- Clear and concise
- Easy to remove once a fix has been implemented
- Explain the “why”, not the “what”
- Written for your future self
Here is a great write-up about how to write effective code comments: How to Write Professional Code Comments: A Beginner’s Guide to Better Code Documentation (dev.to)
Here’s a great example of code comments in action, adapted from the interpolate_curve.R function in Isak Roalkvam’s shoredate package:
Add a citation file
A cff file is a plaintext file with .cff extension containing information that can be picked up by a reference manager to generate clean citations. It follows a yaml format, which is both human- and machine-readable.
See the example below from Maddison Simon’s and Sophie Schmidt’s Percopackage for some common information to include in your cff:
cff-version: 1.2.0
message: "If you use this software, please cite it as below."
authors:
  - family-names: Maddison
    given-names: M. Simon
    orcid: https://orcid.org/0000-0001-5006-6604
  - family-names: Schmidt
    given-names: Sophie C.
    orcid: https://orcid.org/0000-0003-4696-2101
title: "Percopackage"
version: 0.0.0.9001
identifiers:
  - type: doi
    value: 10.17605/OSF.IO/7EXTC
date-released: 2024-08-24
Writing comprehensive documentation
In some situations you might want more comprehensive documentation than can be provided in a README file or as code comments. This can for example be in the form of manual pages for individual function that state what a given function does, the input it requires, what parameters can be adjusted, and the kind of data it returns. It can also be in the form of more expansive documents, for example to lay out a workflow in more detail or to present more specialized use-cases than that which is covered in the more general README.
Below follows outlines for how this can be done in Python and R, respectively:
Comprehensive documentation in Python
When a README file is not enough, or if you want to host your code documentation on a separate website, you can use a documentation generator such as Sphinx. Sphinx is a tool that generates a series of HTML files (or PDF) starting from a directory containing reStructuredText or Markdown files.
Sphinx can be extended in various ways and it can power a whole website including other elements such as blog pages, homepages or books. However, it is primarily used to write documentation websites. To get a sense of what this looks like, look at many big documentation websites which are powered by Sphinx, such as the Python documentation and the Linux Kernel documentation. Other extensions allow using LaTeX scripts within the documentation files.
Sphinx can be set up easily: after installation it’s enough to run sphinx-quickstart from a project folder to create the necessary boilerplate to host the documentation. The documentation can then be extended in whatever way it is preferred. A particularly useful resource within Sphinx is autodoc, which can populate an API documentation page using docstrings from functions in the code.
For example, we can document a function within a code as (example from CodeRefinery lecture on documentation, DOI)
def multiply(a: float, b: float) -> float:
    """
    Multiply two numbers.

    :param a: First number.
    :param b: Second number.
    :return: The product of a and b.
    """
    return a * b
With Sphinx autodoc set up, the multiline comment would be pulled into an “API reference” section. This highlights the importance of writing documentation at the level of the code, and Sphinx allows to access documentation in a specific, well organized location. Because the resulting files are generally HTML, the documentation can then be hosted on a server as its own website, or as part of another website, such as a Github Pages webpage (as in Matteo Tomasini’s example on MetaPypulation (see the code here)).
Because the Sphinx documentation needs to be rebuilt after each change, it’s a good idea to automatize the process through the usage of Github Actions or other CI tools.
Comprehensive documentation in R
The framework of a package offers a natural structure to draw on if you want to provide more comprehensive documentation for a project based in R. While packages are most commonly encountered in the form of software extensions that you can install locally to gain access to extended functionality, this framework also forms the foundation of what (Marwick et al. (2018; Marwick 2017) term a research compendium. The package rrtools, developed by Marwick and colleagues, provides tools to automatically set up a new, sensibly structured directory which you can work in if you aim to conduct and disseminate research in a reproducible manner using R. (Note that rrtools will be useful irrespective of whether the options for extended documentation presented below is relevant to you, as it also helps implementing and setting up other concepts covered in this document, such as a README file, licence, continuous integration, package versioning and more). Packages can also easily be published as websites, for example via the package pkgdown, and so the concept of a package is also related to how you could set up a website or blog using R (see for example Quarto Websites).
The definitive guide for packages in R is the freely available book R packages by Hadley Wickham and Jennifer Bryan, which focuses on the development of software packages in R. However, as the concept of packaging up your work in R extends beyond that of software development, you will also find a wide range of more specialized guides for different use cases, such as setting up websites or writing academic papers by searching the web.
Two general concepts are covered here. One is function documentation and the other is longer-form documents, called vignettes in the context of R software packages. First we can take a look at some examples of both. We’ll use the package kairos by Nicolas Frerebeau for this. You can follow this link to the kairos website to look at the manual page for the function seriate_average(): https://packages.tesselle.org/kairos/reference/seriate_average.html. And this link to take a look at a longer-form vignette that gives a more in-depth presentation of seriation with kairos: https://packages.tesselle.org/kairos/articles/seriation.html.
While this documentation has therefore also been made available on a separate website, it is also distributed with the package and can be accessed directly in R, provided the package is installed locally. Here is the R code to bring up the manual page for the same function:
# Uncomment and run this code line to install kairos
# install.packages(kairos)

# Load kairos
library(kairos)

# These are two methods for bringing up the manual page
# for the function seriate_average() from kairos
?seriate_average
help("seriate_average")
And here is the R code for bringing up the kairos vignette for seriation:
# List all vignettes available for kairos
vignette(package = "kairos")

# Display a specific vignette
vignette("seriation")
When it comes to longer-form documents such as vignettes, typically written in R Markdown or the more recent Quarto format, this general framework extends far beyond software documentation, and can be used to generate any text such as books, research papers, reports, blog posts, supplementary documents and anything else. In the context of a software package, these are typically located in a vignettes/ directory from where the files are rendered in R or on a website, as shown above. In the context of a research paper released with a research compendium, you might instead have one directory called paper/ where the paper itself is located and another called supplementary/ where supplementary documents are stored. A blog, on the other hand, might have directory called posts/ from where each individual blog posts is rendered to a website.
When it comes to documenting functions, this is a slightly more specialized topic in R that can nonetheless be very useful. Manual pages for functions are useful for explaining to a user what a specific function is meant to do, to outline how different parameters can be adjusted and the consequences of this, it can point to other R functions that are relevant in conjunction with a specific function, and it can include useful links or literature references. This documentation therefore provides a more in-depth and comprehensive explanation of an individual function than what is typically laid out in for example a README, while at the same time giving a more top-level explanation in a standardized format than what is usually the case with code comments.
The documentation of a function is commonly set up using roxygen2, which generates a document (in the form of an .Rd file) placed in the directory man/ which R will render when you call the manual page (see https://r-pkgs.org/structure.html for more on how to structure a source package). Documenting a function with roxygen2 also allows a function to be ‘exported’, meaning it will be available for others to use when they attach a package with a library() call.
Documentation with roxygen2 is declared by starting each line of the documentation with #', and is typically placed before the code definition of the function you are documenting. Here is slightly modified example from the R packages book, where a simple function that adds two numbers together is documented using roxygen2 and then the function itself is defined in R code:
#' Add together two numbers
#'
#' @param x A number.
#' @param y A number.
#' @returns A numeric vector.
#' @export
#' @examples
#' add(1, 1)
#' add(10, 1)
add <- function(x, y) {
  # Add the numbers provided to the x and y parameters
  x + y
}
This starts with a description of what the function does. Then follows a list of parameters, stating what input data the function requires and the kind of data this should be. Parameters with default values which can be adjusted should also be listed here. After this is a description of what the function returns, followed by a declaration that the function should be exported. Exporting a function means roxygen2 will add it to be exported via the so-called NAMESPACE file, making the function available for a user that has installed and attached the package. Finally the documentation provides two examples of how the function can be used. After the roxygen2 documentation you can see the function definition itself in code form. A comment has also been added here (using the standard # symbol for defining comments in R) to indicate that you can (and should) still comment specific lines of code, even though this will not be visible on the manual page. You can compare this outline of a roxygen2 documentation to the manual page for ?seriate_average to get a sense of how the different fields end up being formatted.
Longevity
Archive your code in a long-term repository
While commercial platforms like GitHub and GitLab may provide very useful collaboration features, they should not be trusted as long-term stewards of software or data. Professional archives should instead be used to backup public-facing code repositories.
Zenodo is a general-purpose open repository developed under the European OpenAIRE program and operated by CERN, which allows researchers to deposit research papers, data sets, research software, reports, and any other research related digital artefacts. One of its key features is direct integration with GitHub, and once configured, saves a snapshot of each release. For each submission, a persistent digital object identifier (DOI) is minted.
Software Heritage is another archive dedicated to preserving publicly accessible code. It regularly crawls several software forges and package indexes, and anyone can upload their own repositories too.
Archive abandoned projects
It may be prudent to acknowledge when it’s time to tuck a project away and mark it as archived. This will put a banner on your repo and restrict any new pull requests.
If a project has been picked up by others, or the work continues in another forum, make sure to provide a link in the original README!
Develop a release strategy
Sharing code as a series of stable releases makes it easier to share code with predictable functionality. As new features are implemented or when the codebase changes in substantial ways, the software should be rolled into a new release. This enhances clarity for what users can expect when they download a specific release. It also makes it easier to communicate and de-bug issues raised by users by ensuring that all parties are accessing the same codebase.
There are numerous schemes for releasing code, which enable developers to communicate the degree of changes made between versions. Some of these include:
- Semantic Versioning: Major, Minor or Patch versions indicate breaking changes relative to prior versions.
- Alternative Versioning (AltVer): Tracks implementation of major overhauls, new features, and careful maintenance.
- Calendar Versioning (CalVer): For “rolling” releases that follow a regular maintenance cycle.
Productivity
Open issues
Most source code hosting platforms (like GitHub) allow users to open ‘issues’, ‘tickets’ or ‘bug reports’ in repositories. An issue can report a bug (a feature of the software not working as documented and/or expected), a missing feature, or a suggested change. Creating issues in other people’s repositories is a valuable contribution that is usually welcomed by the authors of the software. Don’t assume that, if you encounter a problem with open source software, then someone must already be aware of it – you might well be the first to encounter it, or at least the first to report it!
There are many guides to writing helpful issues and some projects ask for them in a very specific format, often providing a template. Here is some basic advice that will work for most open source projects:
- Always search through existing issues (open and closed) to see if it has already been reported. If so, it is rarely necessary to create a new issue – one exception is if the issue is ‘closed’ because the problem was fixed, but has re-emerged.
- Check if the repository has any specific guidance for issues, e.g. some projects only accept issues reporting bugs, with feature requests directed elsewhere.
- Give a concise but helpful issue title, e.g. “Cannot do X with Y if Z” not “Problem with Y”
- Be concise but thorough in the issue body, describing a) what you expected to happen, b) what actually happened, and c) any suggestions you have for how to fix it.
- For bug reports, always give a minimal reproducible example.
Note that requests for support—asking how to do something with software, not reporting a problem or missing feature—are generally not appreciated as issues. They can sometimes be reframed as issues in documentation, however, e.g. “Missing/unclear documentation on X” not “how do I do X?”
You may experience that the response to your issue by the maintainer of the software is somewhat ‘direct’, or even impolite. This is unfortunately quite common, but usually unintentional. It partly reflects a longstanding tradition in the open source world for a direct, ‘shop-floor’ communication style without markers of politeness that you might expect in e.g. academia.
Open issues in your own repositories
You can also of course create issues in your own repositories. This can be an effective way of managing your own work, as the issues serve as a ‘to-do list’ and on many platforms can be organised into various project management tools. Managing development publicly in this way has several advantages: it allows users to judge the state of development of the software (e.g. is it finished or are a lot of new features still planned); it means users can see if you’re already aware of an issue, before reporting it themselves; others may be motivated to contributed to solving the problem for you (see below on how to encourage collaboration).
Develop a project roadmap
It may be helpful to develop a plan of action to structure future work. Some factors to consider include:
- What features are on the horizon?
- What steps need to be taken to achieve them?
- What resources will be needed to ensure effective action?
- Who can I call on for support?
Effective roadmaps have tangible and measurable outcomes, and are comprised of tasks that can actually be acted upon. See this resource for some great tips on how to write great roadmaps.
Collaboration and Community-Building
Add a license
Licenses describe legal rights for accessing, using and modifying code. Open licenses, which enable widespread and uninhibited use, are increasingly common, however copyleft or opinionated licenses impose restrictions that add conditions based on specific use-cases. For instance, CC-NC limits reuse to non-commercial applications, copyleft forces downstream applications to adopt an equally permissive license for any derivative works, and numerous other licenses are aligned with specific social causes. The Hippocratic License hosts a tool for creating a custom license, including explicit allowances and restrictions for various potential use-cases, such as a Fossil Fuel Divestment module, a Law Enforcement module, and a Supply Chain Transparency module.
Visit choosealicense.com for an extremely detailed survey and comparison of various software and non-software licenses. There is also a page describing what happens if you don’t choose a license.
Note that software licenses are often distinct from licenses intended for non-software materials, such as data, media, documentation and fonts.
Acknowledge contributors
Open source projects thrive based on community support, and acknowledging contributors is a great way to maintain enthusiasm among the team. This can be done in the README, on social media, and in any other venue where you share your work (journal articles, conference presentations, etc).
When acknowledging the people behind the code, be sure to describe how people contribute, including specific things they’ve done to move the project forward.
Highlighting the roles of contributors coming from under-represented backgrounds may also help foster more inclusive developer communities, which is great for enhancing the quality of both communities and codebases.
List your project in a community registry
It may be beneficial to include your project in a community registry to ensure that the work is findable and accessible by target audiences.
Archaeologists may consider reaching out to open-archaeo.info, which is a list of open source software and resources developed by and for archaeologists. AncientMetagenomeDir is a similar resource specializing on tools developed in support of ancient DNA research.
Additionally, the archaeology CRAN task view lists numerous studies that include publicly accessible R code, which is a great resource for understanding how the community uses R in their research.
Post about your work
Share the cool things you make, and communicate the fact that anyone can use or adapt them! Even if the code is messy, it may inspire others to learn about your methods and extend upon what you’ve already done.
Post contributor guidelines
Contributor guidelines inform prospective contributors about how they should engage with the codebase. They may include requests to focus on specific aspects of the project, and requirements to provide specific information in pull requests or issues. They may also outline the parameters through which code is vetted before being folded into the main branch.
Contributing guidelines are often specified in a CONTRIBUTING.md file. The Good Docs Project has written about the value of contributing guidelines, and has also provided a great template for you to adapt for your own project.
Post a code of conduct
A code of conduct demonstrates that you are able to foster a warm and welcoming community. They accomplish this by encouraging ethical and inclusive behaviour and by establishing parameters for a collaborative, respectful and safe work environment.
A code of conduct also needs to be enforceable. It is therefore also necessary to include a response plan that outlines how incidents should be reported and documented, who will receive and handle these incidents, how incidents will be investigated and resolved, and how appeals and conflicts of interests will be handled.
Codes of conduct are often specified in a CODE_OF_CONDUCT.md file. The Good Docs Project has written extensively about codes of conduct, and has also provided templates documents for codes of conduct, response plans, and means of documenting and investigating incidents.
Donate to FOSS projects
While many archaeologists who write code do benefit from a stable income, many do not. In fact, archaeologists who write code tend to be precariously employed. Even a small donation shows deep appreciation, and can help motivate labour performed largely by volunteers.
If you are able to provide financial support, please reach out to the maintainers of your most-used tools to help compensate them for their labour!
Perform a code review
You may think, wait, is this something for a maintainathon? We say yes! Software reviews are valuable for people maintaining the software. It may give hints about what to improve and what to keep just as it is, as it works perfectly already. A review also raises awareness for the software, which is great for developers and potential users alike.
The Journal of Open Source Software is one such place to write about research software. They have a certain scope and focus on the developer side of things. If there is a smaller software package you would wish to review or you would like to focus on less technical details, other journals may be a better place. For example, Archäologische Informationen are happy to take software reviews (such as Thiery et al 2022).
This journal also published Recommendations for the review of archaeological research software, which might help you think of questions to ask yourself in regards to the software you are reviewing. Smaller reviews may also be a good topic for a blog or a social media post. Such appraisals are very valuable for researchers looking for the best solution to their problem!
Technical
Test your code’s functionality
Testing your code involves including additional logic to test whether your code is operating as you expect it to. It is usually a good idea to write these unit tests before you write your code, and really think about what you want the outcome of each function or method to be. And then, as you write the function, test for that outcome as you iterate the development of that function. But often, in the excitement of working on a new project, we forget to test everything.
Writing tests helps you save your code from yourself: If you change things later on, you can make sure that you still get the same results. For more complex projects, you will also want to add integration tests that check whether all the parts work together in the way that you want them to.
Good tests help you make sure that your script, package, or software is maintainable and functional, and does exactly what you want it to. Also, tests are also great documentation! They tell others what you expected from your functions and methods, and help them get into working on your code.
Here are some useful resources for learning how tests can benefit you, and how to write them:
- Unit Tests and Integration Tests - What’s the difference?
- The package testthat in R and how to use it in package development.
- Getting Started With Testing in Python
Be sure to also check the resources about Continuous Integration to see how you can automate your tests (and test your code on multiple operating systems)!
Adding more tests is a great thing to do in a maintainathon! We invite you to follow this great example:
Optimizing for speed and efficiency
Software should run as fast and efficiently as possible. More speed and lower memory and storage requirements are obviously beneficial for yourself and your users. They also lead to lower consumption of the strained, finite resources of our planet. Most importantly, though, higher efficiency can bring about a qualitative difference both in who uses your software, and for what: A script that requires a high performance computing environment is naturally non-reproducible for a user without access to such intensive resources. More people can run fast software with small memory footprint. A script that runs slowly makes it much harder to integrate it in extensive workflows or explore a potential parameter space through thousands of reruns (e.g. with crossvalidation or jackknife resampling). Additionally, software allows new, often unforeseen applications, and better algorithmic and software performance indeed enabled major advancements in tool driven scientific progress (as with Krauss 2025, Sherry & Thompson 2021).
So how to improve the runtime performance of a given script or software tool? Unfortunately there is no universal answer. It depends on the exact goals, constraints and environments for which and where it is applied. Generally the following initial steps should be undertaken, if you already have code that “does the job”:
- Setup tests to make sure that the output stays as expected, even if you experiment with changes to improve the performance.
- Setup a performance test environment to reliably observe differences in time and memory requirements under realistic conditions.
- Run profiling suitable for your development stack (programming language, compiler, environment) with realistic test data to identify cost centers, so the performance-critical parts of your code.
With such a setup you can then attempt to apply changes to speed up your code. What exactly you can and should do depends very much on your stack. A quick google search will certainly yield good advice on how to write fast code in a given language. Here is some universal advice that applies almost always and beyond these specifics:
Use the right algorithms and data structures. This is the single most important thing to look for, because it can easily improve performance by orders of magnitudes. Many abstract problems have been solved extremely efficiently by computer scientists, like e.g. finding the shortest path in a network (Dijkstra’s algorithm) or sorting a list (Quicksort). It is absolutely worth to invest some time to understand your concrete problem on an abstract level, to identify the best known core algorithm.
Rely on established, fast implementations in software libraries. Writing efficient code is hard. Fortunately there are many excellent open source software libraries that solve common tasks very well, e.g. matrix and linear algebra computations (OpenBLAS). Check if you can make use of that for your particular usecase.
Focus on critical code sections. A famous quote by Donald E. Knuth expresses this notion very well:
“Programmers waste enormous amounts of time thinking about, or worrying about, the speed of noncritical parts of their programs, and these attempts at efficiency actually have a strong negative impact when debugging and maintenance are considered. We should forget about small efficiencies, say about 97% of the time: premature optimization is the root of all evil. Yet we should not pass up our opportunities in that critical 3%.” (Knuth 1974).
Optimizing code is fun, but a huge time sink. Think critically if and where this investment pays off.
Setup Continuous Integration
Continuous integration (CI) refers to the process of automating tasks pertaining to the integration of changes and new features into existing software. The automatization process can be setup for different tasks such as building a software, testing, generating documentation, or producing accessible outputs deriving from the codebase. One notable aspect of CI is that they can be triggered by changes in the codebase, which can effectively automate one’s testing environment and documentation-writing processes, ensuring robust software development.
There are several CI tools that can be used, one of the most accessible is Github Actions (but do check out GitLab CI if you work on Gitlab). CI pipelines can also be run locally, specifically to deal with tasks that depend on several pieces of code that are connected in complicated ways. We’ve written a brief introduction to GitHub Actions to help get you started:
Github Actions come in different flavors and can do many different things: for example, if you have setup a website using Github Pages, Github runs actions “under the hood” to build the website after each change committed. But Github Actions can be set-up for our own projects too. There is a whole marketplace of actions to choose from.
By setting up the correct Github Action (or whatever other tool you are using – here we stick with the Github example for clarity), a series of steps is executed everytime the code is pushed to a Github repository. In case of steps that might break something, it is also possible to create Github Actions when a branch is merged, and this can be paired with branch protection rules to stop merges that would break the code.
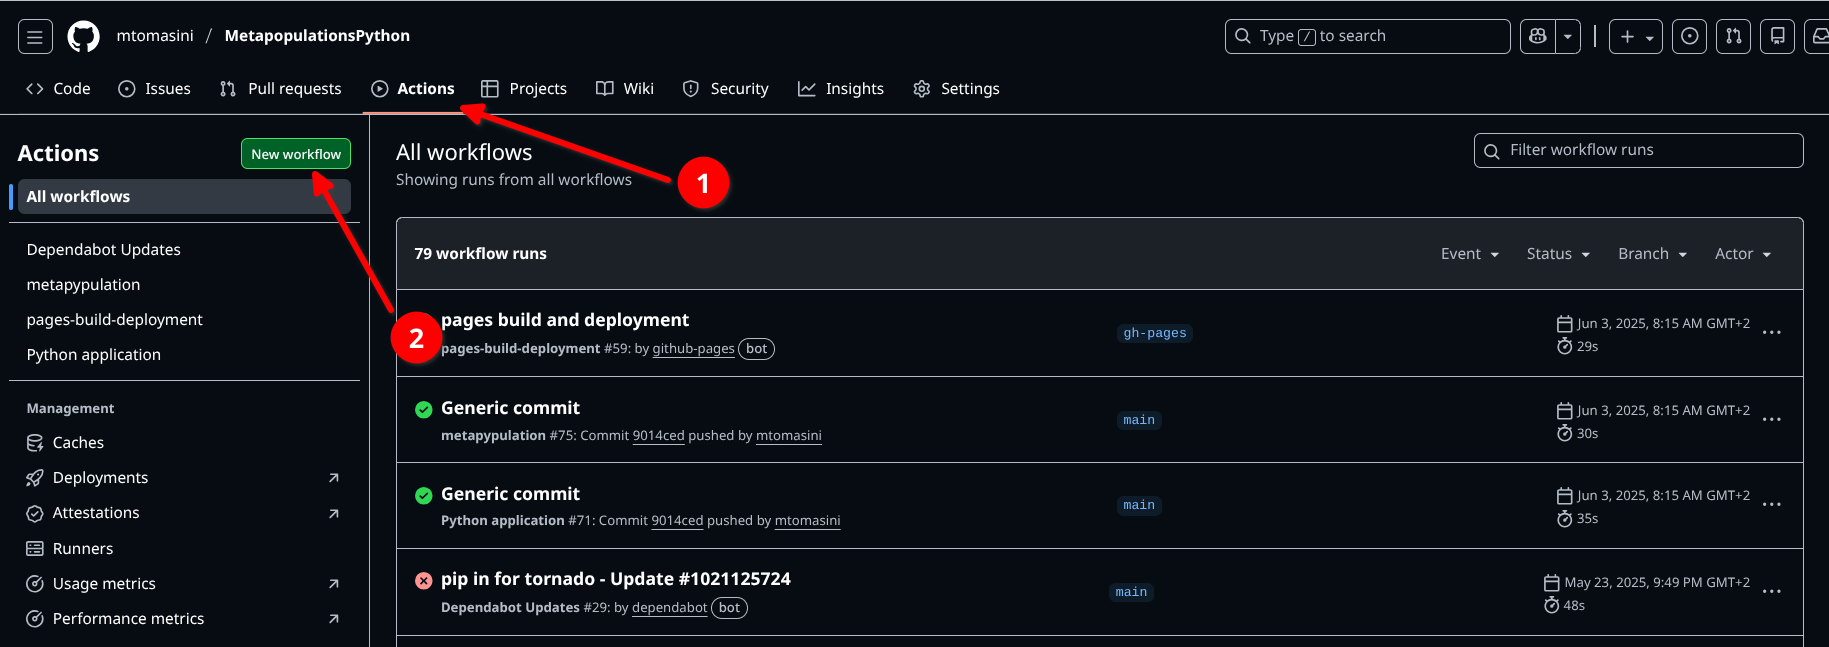
To set up an automatic Github action, one needs to go in the repository of the project and click on Actions, then click on “New Workflow”.
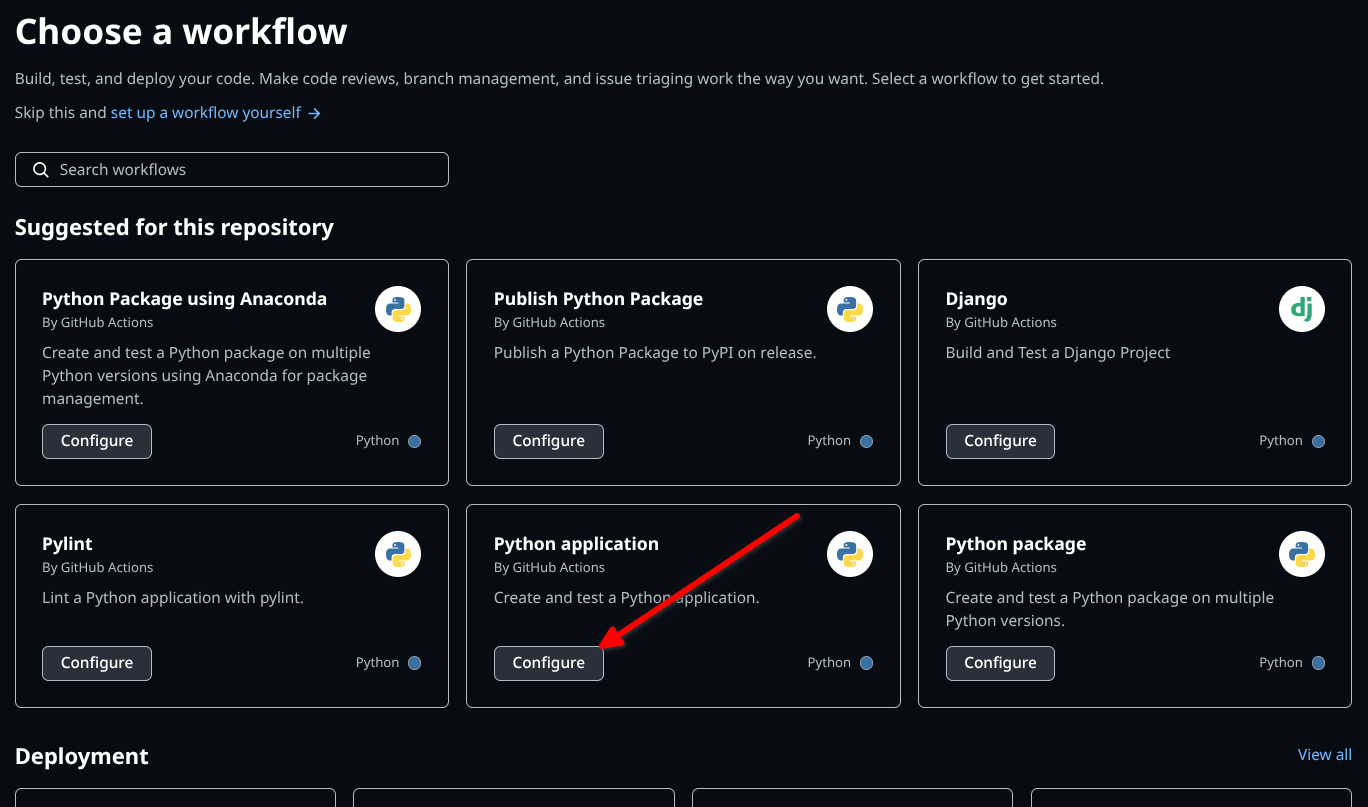
Then, select the action you would like to set up. As an example, to set up automated testing on a Python software, you would choose “Python Application”.
This will create a yaml script in a .github/workflows folder, that can be modified to correspond to one’s own needs. One of the most straightforward ways to use Github Actions is to use it so that tests are run everytime you push a code (see section about testing, above), instead of having to run tests manually. For example, in the following file, the Github Action will perform three actions in order to test a code written in Python:
# This workflow will install Python dependencies, run tests and lint with a single version of Python
# For more information see: https://docs.github.com/en/actions/automating-builds-and-tests/building-and-testing-python

name: Python application

on:
  push:
    branches: [ "main" ]
  pull_request:
    branches: [ "main" ]

permissions:
  contents: read

jobs:
  build:

    runs-on: ubuntu-latest

    steps:
    - uses: actions/checkout@v4
    - name: Set up Python 3.12
1      uses: actions/setup-python@v3
      with:
        python-version: "3.12"
    - name: Install dependencies
      run: |
        python -m pip install --upgrade pip
        pip install flake8 pytest pytest-cov
        if [ -f requirements.txt ]; then pip install -r requirements.txt; fi
    - name: Lint with flake8
      run: |
        # stop the build if there are Python syntax errors or undefined names
2        flake8 . --count --select=E9,F63,F7,F82 --show-source --statistics
        # exit-zero treats all errors as warnings. The GitHub editor is 127 chars wide
        flake8 . --count --exit-zero --max-complexity=10 --max-line-length=127 --statistics
    - name: Test with pytest and calculate coverage
      run: |
3        pytest --cov-report "xml:coverage.xml" --cov=.
    - name: Create coverage
      if: ${{ github.event_name == 'pull_request' }}
      uses: orgoro/coverage@v3
      with:
        coverageFile: coverage.xml
token: ${{ secrets.GITHUB_TOKEN }}- 1
- setting up the Python environment and installing the dependencies to run the Python application (necessitates a requirements.txt file in the directory),
- 2
- linting
- 3
- testing using the functions defined by the user – this last action also generates a test coverage report. Note that you still need to write the tests yourself!
Another way to use Github Actions is to have it (re-)deploy a webpage to the hosting domain everytime the code is pushed. This is something that happens automatically when setting up a Github Pages – Github provides a default Github Action in this case. For example, to deploy the documentation generated with Sphinx on the user’s Github Pages instance (see section about documentation), one could use a code like the following:
name: example

on: [push, pull_request, workflow_dispatch]

permissions:
  contents: write

jobs:
  docs:
    runs-on: ubuntu-latest
    steps:
      - uses: actions/checkout@v4
      - uses: actions/setup-python@v5
      - name: Install dependencies
        run: |
          pip install sphinx myst_parser
          if [ -f requirements.txt ]; then pip install -r requirements.txt; fi
      - name: Sphinx build
        run: |
          sphinx-apidoc -o ./docs/source ./metapypulation
          sphinx-build ./docs/source build/
      - name: Deploy to GitHub Pages
        uses: peaceiris/actions-gh-pages@v4
        if: ${{ github.event_name == 'push' && github.ref == 'refs/heads/main' }}
        with:
          publish_branch: gh-pages
          github_token: ${{ secrets.GITHUB_TOKEN }}
          publish_dir: build/
          force_orphan: true
Additionally, CI is useful for orchestrating the interaction of different pieces of a codebase. This supports the superior practice of writing different pieces of code dealing with different functions, rather than writing one large program that calls different functions in sequence. Imagine, for example, that you have an analysis composed of different steps, each steps producing the input for the next step. In certain situations you will want all steps to run in sequence, but in other situations you would like only certain steps to run (e.g. because other steps have been run previously and need no re-running). Make ensures that each component operates in a manner that corresponds with your instructions.
This is typically accomplishing using GNU Make, a tool that controls how a software will run from a series of source code files. To do this, one can use a makefile, a file that dictates how different pieces of a pipeline interact. While Make is typically operating on languages that need building (think C and C++), other languages have their own tools doing the same thing, such as Snakemake (for Python) and the library MakefileR (for R).
For a distinctively archaeological perspective, consider reading Clemens Schmidt’s reflection on his use of Haskell’s version of Make (Shake) for his archaeoinformatics research.
Further Reading
Research software engineering
Bast, R. et al. (2023) How to document your research software - CodeRefinery lesson. https://zenodo.org/records/8280235
Bast, R. et al. (2025) Automated testing - CodeRefinery lesson. https://zenodo.org/records/16410888
Coelho, J. and Valente, M.T. (2017) Why modern open source projects fail, in Proceedings of the 2017 11th Joint Meeting on Foundations of Software Engineering. ESEC/FSE’17: Joint Meeting of the European Software Engineering Conference and the ACM SIGSOFT Symposium on the Foundations of Software Engineering, Paderborn Germany: ACM: 186–196. https://doi.org/10.1145/3106237.3106246
Irving, D. et al. (2021) Research Software Engineering with Python. https://third-bit.com/py-rse
Nguyễn, S. and Rampin, V. (2022) “Who Writes Scholarly Code?” International Journal of Digital Curation 17(1). https://doi.org/10.2218/ijdc.v17i1.839.
Ratto, M. (2007) “A Practice-Based Model of Access for Science: Linux Kernel Development and Shared Digital Resources,” Science & Technology Studies 20(1): 72–105. https://doi.org/10.23987/sts.55220.
Sholler, D. et al. (2019) “Ten Simple Rules for Helping Newcomers Become Contributors to Open Projects,” PLOS Computational Biology, 15(9): e1007296. https://doi.org/10.1371/journal.pcbi.1007296
Taschuk, M. and Wilson, G. (2017) “Ten simple rules for making research software more robust” PLOS Computational Biology, 13(4): e1005412. https://doi.org/10.1371/journal.pcbi.1005412
Wilson, G. et al. (2014) “Best Practices for Scientific Computing,” PLOS Biology, 12(1): e1001745. https://doi.org/10.1371/journal.pbio.1001745
Wilson, G. et al. (2017) “Good enough practices in scientific computing,” PLOS Computational Biology, 13(6): e1005510. https://doi.org/10.1371/journal.pcbi.1005510
Archaeological software development
Batist, Z. and Roe, J. (2024) “Open Archaeology, Open Source? Collaborative practices in an emerging community of archaeological software engineers,” Internet Archaeology 67. https://doi.org/10.11141/ia.67.13
Bogdani, J. and Sciacca, F. (2020) “An introspective, incomplete, view on the activity of the FLOS community dealing with Archaeology and Cultural Heritage,” ARCHEOFOSS XIV 2020. https://www.jstor.org/stable/jj.14638139.22
Homburg, T. et al. (2021) “Recommendations for the review of archaeological research software,” Archäologische Informationen: 357-370 Seiten. https://doi.org/10.11588/AI.2020.1.81423
Schmidt, S.C. and Marwick, B. (2020) “Tool-driven revolutions in archaeological science,” Journal of Computer Applications in Archaeology, 3(1): 18–32. https://doi.org/10.5334/jcaa.29
Scollar, I. (1999) “25 Years of Computer Applications in Archaeology,” in L. Dingwall et al. (eds.) Archaeology in the Age of the Internet. Computer Applications and Quantitative Methods in Archaeology, Oxford: Archaeopress: 5–10. https://proceedings.caaconference.org/paper/02_scollar_caa_1997
Whallon, R. (1972) “The computer in archaeology: A critical survey,” Computers and the Humanities, 7(1): 29–45. https://doi.org/10.1007/BF02403759
Wilson, A.T. and Edwards, B. (eds.) (2015) Open Source Archaeology: Ethics and Practice. De Gruyter Open Poland. https://doi.org/10.1515/9783110440171
Culture and history of FOSS
Coleman, E.G. (2012) Coding Freedom: The Ethics and Aesthetics of Hacking. Princeton University Press. https://doi.org/10.1515/9781400845293
Kelty, C.M. (2008) Two bits: The cultural significance of free software. Duke University Press. https://www.dukeupress.edu/two-bits
O’Neil, M. (2009) Cyberchiefs: Autonomy and authority in online tribes. London, UK: Pluto Press. https://doi.org/10.2307/j.ctt183pc3c